
Replacing the ignition coil is not very difficult. We highly recommend that the coil be inspected and tested before replacement. This will save you money by ensuring the coil being replaced is actually defective.
Replacing an Externally Mounted Ignition Coil:
1. After testing the coil, remove the bracket hold-down bolts or screws and remove the coil and bracket from the vehicle.
2. Loosen the retaining bolts from the coil bracket and remove the coil.
3. Compare the old and new coil to ensure correct replacement.
4. Install the new coil into the coil bracket.
5. Place the coil and bracket into its mounting position and reinstall the hold-down bolts or screws.
6. Reconnect the primary ignition wires. Place a small amount of dielectric tune-up grease in the coil wire boot and reinstall it into the coil secondary tower.
7. Remove the tape from the wires.
8. Connect the negative battery cable to the battery. Start the engine and test drive the vehicle to ensure correct replacement.
Replacing an Internally Mounted Ignition Coil:
1. After testing the coil, remove the coil screws and lift the coil out of the distributor cap. Use a needle nose pliers to grab the tach and battery lead clips from the cap connector.
2. Lift out the rubber insulator and the old carbon button and spring.
3. Clean the distributor cap cavity and inspect the distributor cap for cracks and carbon tracks. If found, replace the distributor cap and rotor.
4. Install the new carbon button and spring. Coat the new rubber insulator with dielectric tune-up grease and install into the cap.
5. Compare the old and new coil to ensure correct replacement
6. Install the new coil into the cap making sure the two leads are secured properly into the cap connector. Install and tighten the coil screws.
7. Reinstall the coil cover.
8. Reinstall the distributor cap onto the distributor and tighten the four quarter turn screws.
9. Reconnect the coil primary, tach and battery connectors to the cap.
10. Reinstall the ignition wire set retainer. A small screwdriver may aid in fastening the clips.
11. Connect the negative battery cable to the battery. Start the engine and test drive the vehicle to ensure correct replacement.
Replacing the Distributorless Ignition System (DIS)
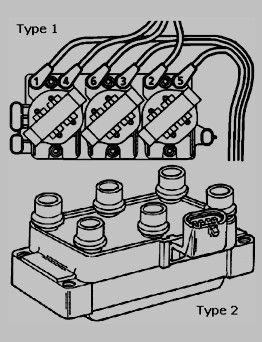
Many of today's vehicles are equipped with D.I.S. or distributorless ignition systems. These vehicles do not use a distributor. In place of the distributor they use sensors to fire an ignition coil pack. There are two styles of ignition coil packs. The first type of coil pack has all the coils mounted on one mounting pad. If any of the coils are found to be defective, the entire coil pack must be replaced.
The second type of coil pack has all the coils mounted individually on a mounting pad. On this system, if one coil is found to be defective, it may be replaced as a separate unit. Testing procedures on these coils are the same as the procedures described earlier. As always you should refer to a specific automotive service manual for details and specifications on your vehicle.
» More Information 

 Ignition Coils


